MD: All it takes is one slip up and then it’s game over for your WordPress website. And that’s why a WordPress two factor authentication is the solution you seek.
No matter how many times security protocols and algorithms get revised, your WordPress site will eventually succumb to the sneaky, underhanded tactics of bots, spammers and hackers alike. In this article, I am going to educate you how to add two-factor authentication for WordPress using both SMS text message and Google Authenticator.
Why Do You Need A 2FA For WordPress?
The reason why a two-factor authentication is required is because hackers are prone to using a common trick known as brute force attacks. This is done by the use of automated scripts that hackers use to decipher one’s username and password in order to infiltrate their site.
Once they have your credentials figured out, there’s no stopping the fiends from violating all your years of hard work and dedication from going down the drain.
But that’s where WordPress ups their security game by utilizing the proven powers of two-factor authentication. Not only is it easy to set up, but it is also free. The two ways in which you can do this is with SMS verification and Google Authenticator.
Here are two of the easiest ways you can acquire the 2FA on WordPress for free. WordPress authenticator for yourself.
- SMS Verification to WordPress Login Screen
You can use this step to add a two-step SMS verification to your WordPress login screen. After entering your WordPress site username and password, you will receive a text message via SMS on your phone that will include a code.
Before you get started, you must first install the Two Factor and Two Factor SMS plugins. The Two Factor plugin, grants you a number of ways to set up a 2-step authentication for WordPress.
The other one known as Two Factor SMS, is an addon for the first plugin and it provides support for the 2-Step SMS verification.
Once that is done, head on over to the Users » Your Profile page and then scroll down to the Two Factor Options section.
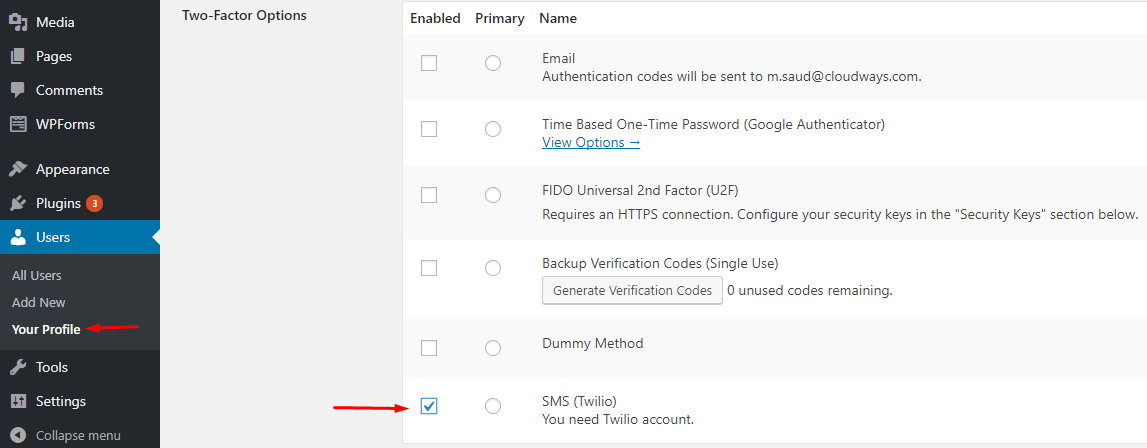
(Add Image)
Ensure that the box that is next to the ‘SMS (Twilio)’ option and then click the radio button to make this your primary verification method.
Then scroll down to the Twilio section.
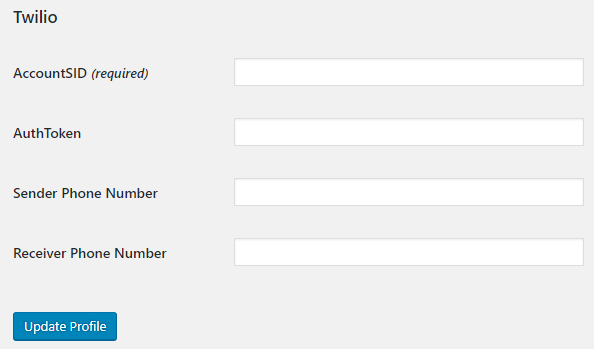
You have to feed in all of the information relating to your Twilio account.
Just so you should know, Twilio is an online service that offers voice messaging, phone, as well as SMS services to use with your own applications. They also have a free plan, which is more than enough for you at this point.
If you don’t have an account then I would suggest that you go to their website immediately as it is a free and painless process.
(Add Image)
You have to provide your personal information once you’re at the signup page. Then you will be asked to mention which products you want to use first.
(Add Image)
Select SMS and then the 2-factor authentication for the ‘What you are building’ option. Lastly, you have to choose PHP as your programming language.
After signing up, you will be directed to your Twilio dashboard. From there, all you need to do is click on the ‘Get Started’ button and you’re good to go.
(Add Image)
You will then be taken to the settings wizard page, of which you need to click on the the ‘Get your first Twilio number’ button.
(Add Image)
In the popup that shows up, Twilio will generate a phone number for you. Before clicking on the ‘Choose this number’ button, you must cope and save this number in a text file.
(Add Image)
As soon as you are done with the wizard, go straight to the Settings » Geo Permissions page.
For this, you have to select the countries where you will be sending SMSs. And since you yourself are going to be receiving an SMS, you can choose the country that you live in, as well as others where you have traveled.
(Add Image)
Then you have to visit your Twilio account and copy your Auth Token and Account SID.
(Add Image)
Now that you have all of the information you need, all you need to do now is go to your WordPress site’s user profile page and input your Twilio Account Auth Token, SID, and phone number.
You can add your own phone number as the ‘Receiver Phone Number’.
When you’re done, just be sure to click on the ‘Update Profile’ button to save your settings.
Logout from your account and then use the plugin.
From the login screen, feed in your WordPress username and password. You will then receive an SMS that contains a text message which includes the code for verification.
(Add Image)
It is only by entering this code will you be able to access your WordPress admin area.
This is a great method, but what about in some cases when you are travelling?
Don’t worry! I have just the contingency plan for that and it is the next step in the WordPress two factor authentication process.
- Google Authenticator
While SMS is still your primary means of verification, it isn’t the only way to get into your site. In this case, the Google Authenticator app is the perfect counter.
Just go to the Users » Your Profile page and scroll down to the two-factor options section.
(Add Image)
Check the ‘Enabled’ box that belongs to the ‘Time Based One-Time Password (Google Authenticator)’ option and then click on the ‘view options’ link to start setting up Google Authenticator.
(Add Image)
A QR code will be generated and you have to use the Google Authenticator app to scan it.
Of course, you have to first download and install the Google Authenticator app on your phone first.
After you have installed the app, open it and then click on the add button.
(Add Image)
Now use your phone’s camera to scan the QR code that was previously generated.
The app will automatically add your website once it detects it. It will even show you a six digit code. Once you have entered that code in the plugin’s settings page, you’re on your way.
Just so you don’t lose your settings, click on the ‘Update Profile’ button.
Now you can logout of your WordPress site to see the whole thing in action yourself.
You first need to provide your WordPress username and password. After that, you will be asked to give enter your SMS verification code.
(Add Image)
And if you don’t get an SMS, you can always click in the ‘Use backup method’ link and enter the code that Google Authenticator app on your phone generates for you.
Conclusion
Now that you have all the necessary know-how of setting up a WordPress two-factor authentication for your WordPress site, you can rest a lot easier now.